
Utilizing Configuration Manager, we could bundle Visual Studio 2019 and send it to our endpoints. The Visual Studio 2019 is an inventive take-off platform that you can rely on to alter, investigate, and assemble code, and afterwards distribute an application.
Guide to Deploy Visual Studio 2019 using SCCM
An integrated development environment (IDE) is a component rich program that can be utilized for some parts of programming development. The Visual Studio incorporates code finish instruments, compilers, graphical creators, and a lot more highlights to facilitate the product advancement method.
Through this post, I will discuss deploying the Visual Studio 2019 utilizing SCCM. But however, SCCM training would benefit you a lot and make your expertise in this field.
Visual Studio 2019 Editions
The Visual Studio 2019 versions incorporate:
- Visual Studio Enterprise 2019
- Visual Studio Professional 2019
- Visual Studio Community 2019
- Visual Studio Team Foundation Server Office Integration 2019
the best Visual Studio is accessible for Windows and Mac. When you convey Visual Studio 2019 utilizing SCCM, hardly any things change. It incorporates the install option, parts that you download and so on. We will convey Visual Studio 2019 Professional utilizing SCCM. The means will stay the same when you convey the endeavour version.
Visual Studio 2019 System Needs
Before you convey Visual Studio 2019 utilizing SCCM, you should understand the framework necessities. It is best significant on the grounds that the endpoints should meet these necessities.

Downloading Visual Studio 2019 Enterprise
Microsoft does not assure you of an installer that is offline to Visual Studio 2019. It is on the grounds that Visual Studio 2019 has got a parcel of segments and an end client might not require all parts. A Visual Studio Installer is approx. 1.32 MB in size.
Utilizing the Visual Studio installer, you could download what is needed for your task. Be that as it may, with best regards to sending Visual Studio 2019 on different PCs, you certainly require an installer alongside installation records. In every PC downloading GB’s of information from Microsoft, it doesn’t make any sense.
Microsoft permits you to download the segments that are needed. A total design for one language region needs around 35 GB of disk space for the Visual Studio Community. The equivalent download weighs 42 GB for Visual Studio Enterprise. Extra language locales need about a large portion of a GB each.
Download the most recent adaptation of Studio 2019 from the Visual Studio downloads area. We will utilize the executable document to download the segments.
The commands given below downloads visual studio professional 2019 in full format with en-US as the default language.
Target destination:
- Folder way where you need to download the records
- vs_professional.exe –layout Destination –lang en-US
- The command given below downloads visual studio endeavour 2019 complete format with en-US as the default language.
- vs_enterprise.exe –layout Destination –lang en-US

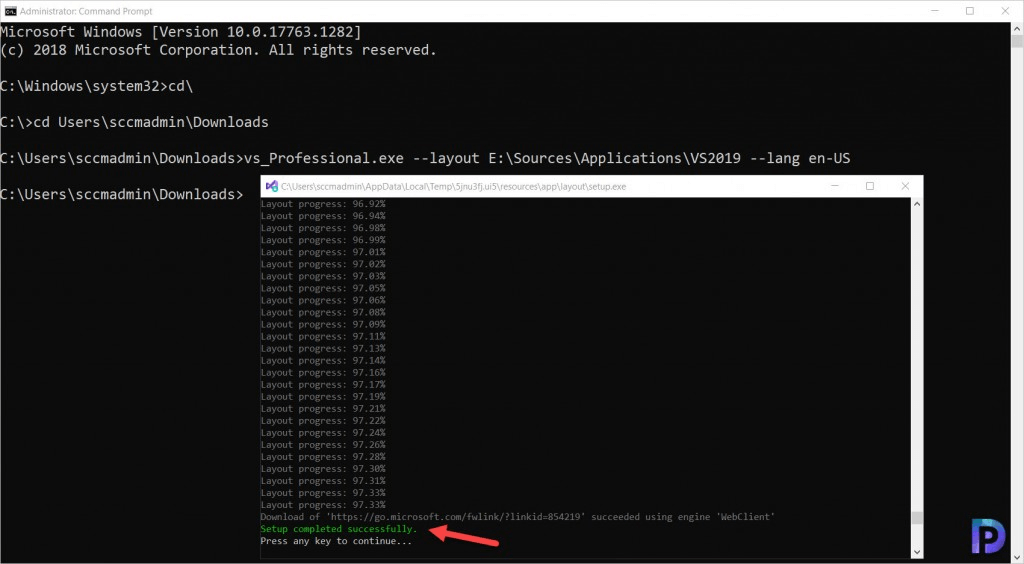
The download size of Visual Studio 2019 is 28.7 GB. That is on the grounds that we downloaded the total local design. We will utilize this envelope to package and send Visual studio 2019 utilizing SCCM.

Making Visual Studio 2019 Application in SCCM
- We will make another application for Visual Studio 2019 in SCCM. Launch the Configuration Manager console and explore Software Library\Overview\Application Management\Applications.
- Right snap Applications and click Create Application.
- On the General window, choose Manually indicate the application data. Click Next.
- Indicate the overall data about the Visual Studio 2019 application. This incorporates the name of the application, distributor information, software form and so forth. Choose Next.
- Click next in the Software Center window, you can indicate Visual Studio 2019 symbols.
- Click the Add button in the Deployment Types window.
- Choose Manually determine the sending type data in the Create Deployment wizard. Snap Next.
- Indicate the content area. Specify the organizer which includes all the records including the VS 2019 install document.
- Indicate the install and uninstall the program.
- Visual Studio 2019 Install Program – vs_professional.exe –quiet –wait –norestart
- Visual Studio 2019 Uninstall Program – vs_professional.exe /uninstall /force /quiet /norestart /log “C:\Windows\Temp\VS_Uninstall.log”
- Click Next.
- You should add a detection strategy to recognize the presence of Visual Studio 2019. Indicate the accompanying as detection strategy.
- Setting Type – File System
- Type – File
- Path – %ProgramFiles(x86)%\Microsoft Visual Studio\2019\Professional\Common7\IDE
- File or Folder Name – devenv.exe
- Choose “The file system setting must satisfy the following rule to indicate the presence of this application”.
- Property – Version
- Operator – Greater than or equal to
- Version – 16.4.30802.185
- Click OK.
- Mention the user experience settings for VS 2019 deployment. Click Next.
- Click Next on the Requirements and Dependencies window. Verify the settings on the Summary window.
- Close the Create Deployment type wizard and Create Application wizard. Now we are set to deploy Visual Studio 2019 utilising SCCM.
Deploying Visual Studio 2019 by SCCM
- Dispatch the Configuration Manager console.
- Explore to \Software Library\Overview\Application Management\Applications.
- Right snap Visual Studio 2019 application and click Deploy.
- Indicate the target gadget assortment on the General window. Snap Next.
- On the off chance that you haven’t dispersed the content to appropriation points, you can execute it in this progression. Click the Add button and choose the distribution points. Snap Next.
- Choose the action as Install and purpose as Available option on the Deployment Settings window. Snap Next.
- You may plan the application sending or just snap Next to convey the application at the earliest opportunity. Snap Next.
- Indicate the User Experience settings. Click Next.
- Click Close on the Completion window.
Installing Visual Studio 2019 – SCCM Software Center
- Log in to the customer machine and dispatch the Software Center.
- On the off chance that this machine is essential for target gadget assortment, the Visual Studio 2019 application ought to show up in Software Center.
- Choose the Visual Studio 2019 application and snap Install.
- You can utilize the Configuration Manager control board applet to change the accessible transitory space. The above mistake is normal in light of the fact that the application download size is enormous and you may have to expand the ccmcache size. There are two different ways to expand the customer store size in SCCM.
- To change the ccmcache size on various machines, Go to Administration\Overview\Client Settings.
- Alter the customer settings and snap Client Cache Settings.
- Under Device Settings, set Configure customer reserve size to Yes.
- Design the Maximum store size (MB).
- The download works after expanding the cache size.
- The Visual Studio 2019 application installation is effective. You can screen the application establishment progress utilizing the AppEnforce.log file.
Conclusion | Guide to Deploy Visual Studio 2019 using SCCM
I hope the above blog post has enough information to know how to deploy visual studio 2019 using the SCCM. Moreover to be an expert or proficient in any field certifications are mandatory. If you have any related queries or are looking for any information beyond this please do comment below. We will get back to you soon.